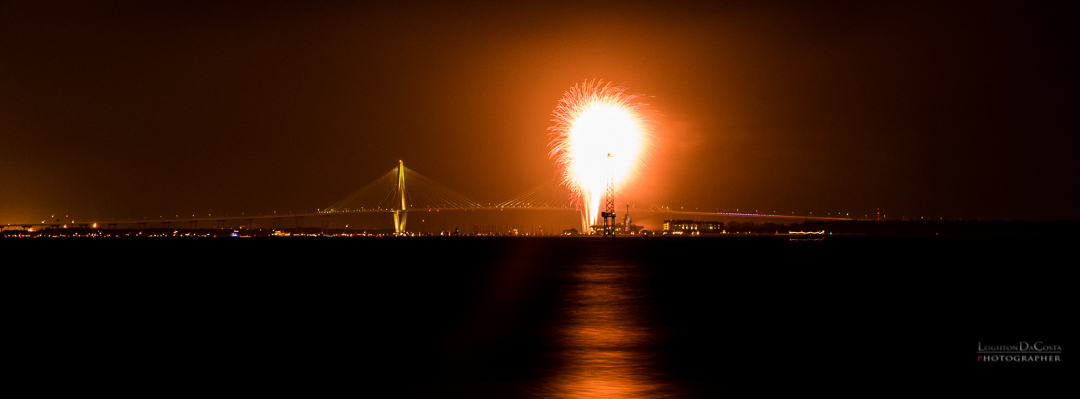
Charleston Harbor July 4, 2016.
This is a 17 frame HDR Merge done in Adobe Lightroom.
I do not normally photograph fireworks, because I would rather just sit, watch, and enjoy them. This year for the Fourth of July, I was fortunate enough to have a great vantage point to watch the fireworks over most of the Charleston area. The one I came to watch, was the big one over the U.S.S. YORKTOWN, a retired, World War II Aircraft Carrier from the US Navy.
The fireworks were absolutely beautiful and I wanted to share a couple of things I learned that night for those wanting to do fireworks photography.

Straight out of camera Shot of the fireworks over Charleston Harbor
Known Knowns
Slow Shutter Speeds. When Photographing moving luminous objects, to give a sense of motion, you are going to want to use a slow shutter speed to better capture the trailing light. I know many who photograph around 1-5 second exposures. Because of the distance, and the width of the lens I was using that night, I was between 15-25 seconds in exposure time.
TRIPOD!!! Bring a tripod to give you the best stability when doing long exposures. Not only will it keep your camera stable, but it will allow you to take several images with identical frames that makes post production easier.
Mirror Up. While I had already planned on using the live view function on my Nikon D810, I knew that I was only going to use it for precision focusing. In my experience, when using long exposures over 15 seconds, the mirror slap in a DSLR can cause enough vibrations to cause motion blur in distant luminous objects like stars and fireworks. For ideal stillness, photograph using a laptop and a tether cable, so you do not have to touch the camera at all.
Known UNKNOWNS
- Lens Selection. When I first thought about about shooting the fireworks, I really wanted a wide perspective, so had all intent on using the Rokinon 14mm f/2.8 manual focus lens. I absolutely LOVE that lens. Something told me though, to bring my Nikon 24-70 f/2.8 lens; and it might have served me better to have brought my 70-200mm f/2.8 lens as well. due to the distance that I was photographing from. For future shoots, I plan on bringing something really wide, and something really tight, in addition to my intended lenses for an additional perspective.
Straight out of camera shot; you may not know when something may go off causing a little more light than expected.
UNKNOWN UNKNOWNS
- Wind and Weather. Wind and weather will play a part in which way your streams actually fall and how long the smoke stays around. With digital photography, you can do some immediate correction, but with film photography not as easy. I would advise carrying a simple point and shoot with manual functionality that can slow the shutter down enough to let you know what the wind and smoke are doing.
- Ambient/City Light. When photographing fireworks in the distance, you will have a disadvantage of having bright city lights in the background as well, which will compete with your fireworks. Consider adjusting your f/stop to reduce the highlights of the lights.
While there is much more that goes into capturing fireworks, these are just a few things that I took into consideration and wanted to share with you. I had a lot of fun and can't wait to do this again!
LD